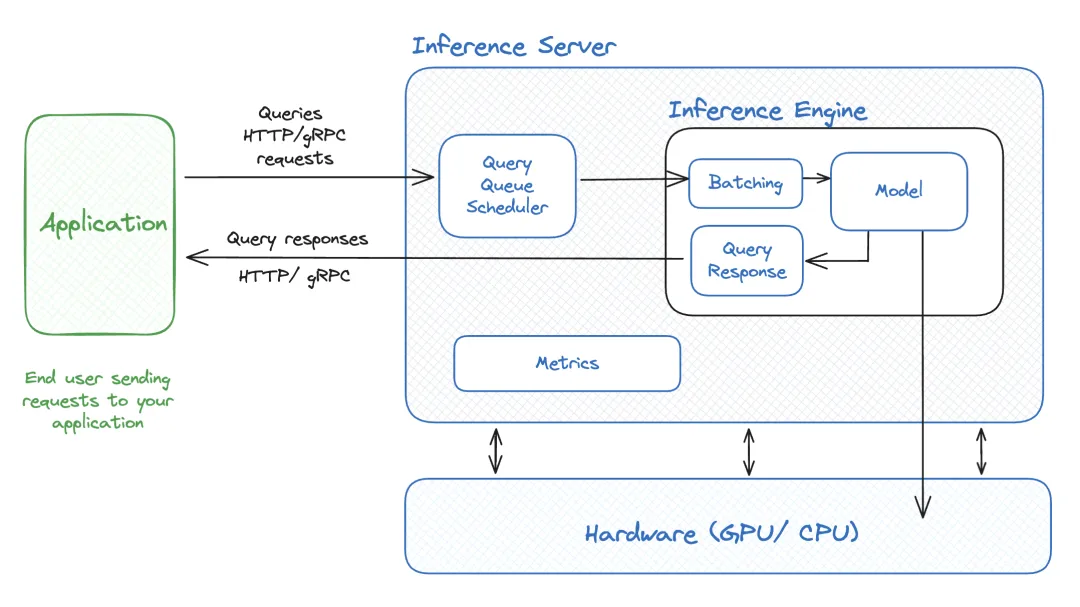
大模型入门指南 - Inference:小白也能看懂的“模型推理”全解析
对于刚接触大模型(如GPT、LLaMA、DeepSeek、Qwen等)的新手来说,"推理(Inference)"可能是最让人困惑的术语之一。它不像"训练"那样直观,也不像"微调"那样有明确的目标,但却是大模型从"学习"到"干活"的关键环节。
一、概念解读
- 训练:就像学生背书、刷题,目标是记住知识(模型参数)。
- 推理:就像学生考试,根据题目(输入)写出答案(输出),但不再翻书(不更新参数)。
二、技术实现
1. PyTorch 原生推理:开发调试的“零封装”方案
直接加载训练好的.pt/.pth模型,通过model.eval() + torch.no_grad()切换推理模式,复用训练代码逻辑(代码复用率超85%)。import torchfrom ultralytics import YOLO # YOLOv8专用库from PIL import Image# 1. 加载预训练的YOLOv8模型(支持多种尺寸:nano/small/medium/large/x-large)model = YOLO('yolov8n.pt')# 2. 切换至推理模式(YOLOv8自动处理,无需手动调用eval())# 3. 设置计算设备(GPU加速)device = 'cuda' if torch.cuda.is_available() else 'cpu'model.to(device) # 将模型移至GPU/CPU# 4. 加载输入图像image_path = "test_image.jpg"image = Image.open(image_path).convert("RGB")# 5. 执行推理(自动预处理、推理、后处理)results = model(image) # 输入支持PIL/OpenCV/numpy格式# 6. 解析检测结果(直接输出结构化数据)predictions = results[0].boxes.data # 获取检测框数据(Tensor格式)print("检测结果(原始Tensor):\n", predictions)# 7. 转换为DataFrame格式df = results[0].pandas().xyxy[0] # 转换为Pandas DataFrameprint("结构化检测结果:\n")print(df[['xmin', 'ymin', 'xmax', 'ymax', 'confidence', 'class', 'name']])# 8. 可视化与保存结果results[0].show() # 显示带标注的图像results[0].save("output/") # 保存结果到output目录
2. Transformers 库推理:预训练模型的“一键式”部署
transformers库加载预训练模型(基于Transformer架构的from transformers import AutoTokenizer, AutoModelForCausalLM# 1. 加载模型和分词器model = AutoModelForCausalLM.from_pretrained("llama-7b")tokenizer = AutoTokenizer.from_pretrained("llama-7b")# 2. 输入预处理input_text = "解方程:3x + 5 = 32"input_ids = tokenizer(input_text, return_tensors="pt").input_ids# 3. 推理生成output = model.generate(input_ids, max_length=100)# 4. 后处理answer = tokenizer.decode(output[0], skip_special_tokens=True)print(answer) # 输出:"步骤1:两边减5 → 3x=27;步骤2:两边除以3 → x=9"
from fastapi import FastAPI, File, UploadFilefrom PIL import Imageimport torchfrom io import BytesIOimport base64# 初始化FastAPI应用app = FastAPI()# 加载预训练的YOLOv8模型(目标检测)model = torch.hub.load('ultralytics/yolov5', 'yolov8s') # 'yolov8s'为YOLOv8的小模型版本# 可选其他版本:'yolov8n'(nano)、'yolov8m'(medium)、'yolov8l'(large)、'yolov8x'(extra-large)async def predict(image: UploadFile = File(...)):# 1. 读取上传的图像contents = await image.read()image_pil = Image.open(BytesIO(contents)).convert("RGB")# 2. 执行推理(YOLO自动处理预处理和后处理)results = model(image_pil)# 3. 解析结果detections = results.pandas().xyxy[0] # 转换为DataFrame格式output = []for _, row in detections.iterrows():output.append({"class": row["name"],"confidence": row["confidence"],"bbox": [row["xmin"], row["ymin"], row["xmax"], row["ymax"]]})# 4. 返回结果(可选:返回带标注的图像Base64编码)results.render() # 在图像上绘制检测框buffered = BytesIO()results.save(save_dir=buffered, format="JPEG") # 保存到内存image_base64 = base64.b64encode(buffered.getvalue()).decode("utf-8")return {"detections": output,"image_with_boxes": image_base64 # 可选字段}# 启动命令:uvicorn main:app --host 0.0.0.0 --port 8000